Versetta Stone Installation A Complete Guide
Versetta Stone installation: It sounds straightforward, right? But transforming your home’s exterior with this popular stone veneer requires more than just slapping some panels onto a wall. This comprehensive guide dives deep into every aspect, from initial planning and material selection to mastering complex installation techniques and ensuring long-term durability. We’ll unravel the secrets to a flawless finish, covering everything from choosing the right Versetta Stone type for your project to troubleshooting common installation pitfalls. Get ready to elevate your home’s curb appeal with a professional-looking Versetta Stone installation you can be proud of.
We’ll cover the essential tools and materials, step-by-step installation instructions with helpful visuals, and expert tips for handling tricky areas like corners and edges. We’ll also address budgeting concerns, providing realistic cost estimates and factors that can influence your project’s overall expense. By the end, you’ll possess the knowledge and confidence to tackle your Versetta Stone project with ease, regardless of your experience level.
Versetta Stone Product Overview
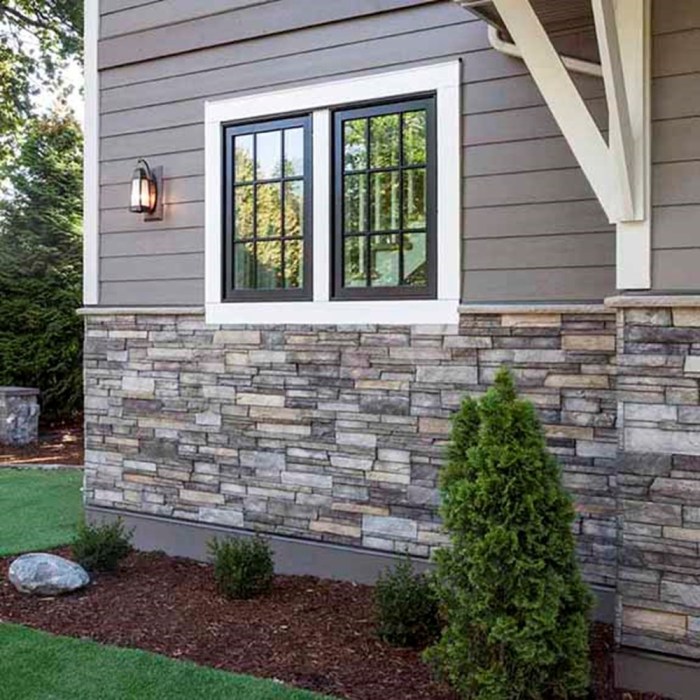
Versetta Stone offers a compelling alternative to traditional brick and stone veneer, providing a realistic look with significantly reduced weight and installation time. Its innovative interlocking system simplifies the process, making it a popular choice for both DIY enthusiasts and professional contractors. This overview will explore the various product lines, highlighting their advantages and disadvantages compared to other cladding materials.
Versetta Stone manufactures a diverse range of products designed to mimic various natural stone appearances. The company achieves this through a process involving high-quality, durable materials and precise molding techniques. The resulting panels are lightweight yet robust, offering a cost-effective and visually appealing solution for exterior wall cladding, accent walls, and even fireplace surrounds.
Versetta Stone Product Types
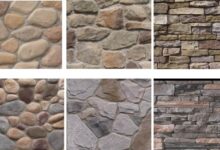
Versetta Stone offers a wide array of styles to complement diverse architectural designs. Their product lines are categorized primarily by the appearance they emulate, ranging from traditional brick to more modern, sleek designs. Popular choices include those mimicking Ledgestone, fieldstone, and various brick patterns. Each line offers subtle variations in color, texture, and size to provide a realistic and natural look. For example, the Ledgestone collection features irregular shapes and subtle color variations to replicate the natural look of stacked ledger stone, while the brick lines offer consistent, uniform units for a more classic appearance.
Advantages and Disadvantages of Versetta Stone
Versetta Stone presents several key advantages over other cladding materials. Its lightweight nature significantly reduces installation time and labor costs compared to traditional stone or brick. The interlocking system simplifies installation, requiring fewer tools and expertise. Furthermore, Versetta Stone is relatively low-maintenance, requiring minimal cleaning and upkeep. However, it’s important to acknowledge that Versetta Stone, like any manufactured product, has limitations. While durable, it’s not as resistant to extreme impacts as natural stone. The color and texture, though designed to mimic natural materials, are ultimately consistent across panels, which some may find less aesthetically pleasing than the inherent variability of natural stone. The initial cost might be slightly higher than some less expensive alternatives, but the long-term cost savings in labor and maintenance often outweigh this.
Versetta Stone Product Comparison
The following table provides a comparison of key features across several Versetta Stone product lines. Note that pricing can vary depending on location, retailer, and specific product selections.
| Product Line | Material | Approximate Weight (per sq. ft.) | Price Range (per sq. ft.) |
|---|---|---|---|
| Ledgestone | Polymer Concrete | Approximately 2-3 lbs | $8-$15 |
| Traditional Brick | Polymer Concrete | Approximately 2-3 lbs | $7-$12 |
| Fieldstone | Polymer Concrete | Approximately 2-3 lbs | $9-$16 |
| Modern Stacked Stone | Polymer Concrete | Approximately 2-3 lbs | $10-$18 |
Note: Weight and price ranges are approximate and can vary based on specific product and retailer. Consult your local supplier for precise details.
Installation Preparation
Proper preparation is crucial for a successful Versetta Stone installation. Failing to adequately prepare the surface can lead to issues such as uneven installation, loose stones, and ultimately, a less-than-professional finished product. This section Artikels the necessary steps and safety precautions to ensure a smooth and efficient installation process.
Before you even think about placing the first stone, you need to gather the right tools and materials. This will save you time and frustration in the long run, preventing mid-project trips to the hardware store. A well-organized approach ensures a cleaner, more efficient workflow.
Necessary Tools and Materials
The tools and materials required for Versetta Stone installation are readily available at most home improvement stores. Having everything on hand before you begin will streamline the process and minimize interruptions.
- Versetta Stone panels (calculate the required amount based on your project’s square footage, adding extra for cuts and waste)
- Mortar (choose a high-quality exterior-grade mortar suitable for the substrate)
- Notched trowel (for consistent mortar application)
- Measuring tape and level
- Rubber mallet (for gently tapping stones into place)
- Safety glasses and gloves
- Utility knife or masonry saw (for cutting stones)
- Bucket and water
- Wheelbarrow (for mixing mortar in larger quantities)
- Safety harness and fall protection equipment (for high-altitude work)
Surface Preparation
Proper surface preparation is paramount. A poorly prepared surface can lead to problems with adhesion and ultimately a compromised installation. Take the time to ensure the surface is clean, level, and structurally sound. This is where the bulk of your prep work will occur.
Begin by thoroughly cleaning the surface to remove any loose debris, dirt, dust, or old paint. Pressure washing is often effective but ensure you allow ample drying time afterward. Any remaining residue can impede proper adhesion of the mortar. Next, assess the levelness of the surface. Significant variations in level require leveling before installation to ensure a consistent and visually appealing finished product. This might involve applying a leveling compound or adjusting the framing. Finally, ensure the structural integrity of the underlying surface. Any cracks or weak points should be repaired before installation. For example, you might need to add bracing or reinforce existing structures.
Safety Precautions
Safety should always be the top priority during any construction project. Versetta Stone installation, while generally straightforward, involves the use of tools and materials that require careful handling.
- Always wear safety glasses to protect your eyes from flying debris.
- Wear work gloves to protect your hands from cuts and abrasions.
- Use appropriate respiratory protection when working with mortar or cutting stones.
- Ensure proper ventilation to avoid inhaling dust or fumes.
- Use caution when working at heights; always use fall protection equipment if necessary.
- Follow the manufacturer’s instructions for handling and applying mortar.
- Keep the work area clean and organized to prevent tripping hazards.
Installation Techniques
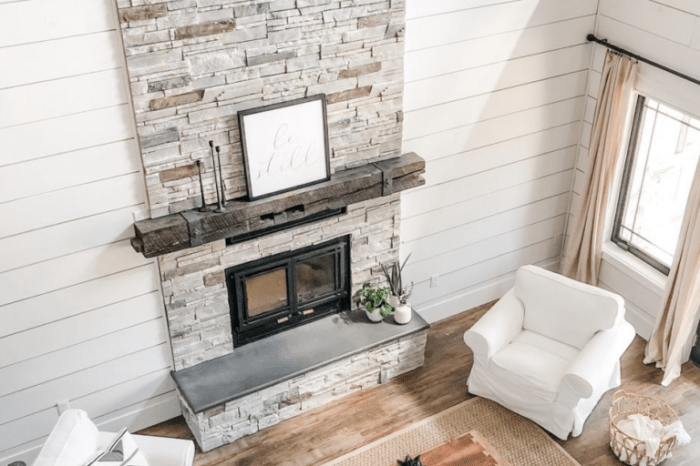
Installing Versetta Stone is a relatively straightforward process, but careful attention to detail is crucial for a professional-looking finish. This section details the step-by-step installation, addressing common challenges and offering solutions for achieving seamless results. Proper preparation, as discussed in the previous section, is paramount to a successful installation.
The core installation method involves applying adhesive to the back of the Versetta Stone panels and pressing them firmly onto the prepared surface. The interlocking system of the panels simplifies the process, ensuring a consistent and secure bond. However, specific techniques are required for corners, edges, and cuts, which will be detailed below.
Panel Installation
Begin installation at a corner or a visually prominent point. Apply a consistent bead of high-quality construction adhesive to the back of the Versetta Stone panel, ensuring full coverage of the contact area. Press the panel firmly against the prepared substrate, holding it in place for several seconds to ensure a secure bond. Repeat this process for subsequent panels, ensuring each panel interlocks securely with the previously installed panel. Work in small sections, checking for alignment and levelness frequently. Maintain consistent adhesive application to prevent gaps or inconsistencies.
Corner Installation
Versetta Stone offers specific corner pieces designed for seamless transitions. However, achieving a clean corner can also be done by carefully cutting standard panels. For external corners, use a miter saw to cut panels at a 45-degree angle. The cut edges should then be butted together, ensuring a tight fit. For internal corners, similar angled cuts are needed but the panels will overlap slightly. Always use a high-quality masonry blade to avoid chipping or fracturing the stone.
Edge Installation
Edge installations often require cutting panels to fit specific dimensions. Accurate measurements are essential to ensure a clean and professional finish. Use a measuring tape and a pencil to mark the desired cut line on the panel. Employ a wet saw with a diamond blade for precise cuts, ensuring the blade is properly lubricated to minimize dust and chipping. This method provides a cleaner edge compared to other cutting methods.
Cutting Versetta Stone Panels
Cutting Versetta Stone requires specialized tools to prevent damage to the panels. A wet saw with a diamond blade is the recommended method for precise and clean cuts. Always wear safety glasses and a dust mask when cutting. Dry cutting is possible using a score-and-snap method, but this can lead to uneven edges and potential chipping. For intricate cuts, consider using a hand-held angle grinder with a diamond blade. Remember to lubricate the blade frequently when wet cutting to maintain a clean cut and extend the life of the blade.
Troubleshooting Common Issues
Versetta Stone, while designed for ease of installation, can present challenges. Understanding these potential problems and their solutions is crucial for a successful project, ensuring a beautiful and long-lasting finish. This section details common issues and provides practical, step-by-step solutions to help you overcome them.
Uneven Surfaces
Uneven wall surfaces are a frequent hurdle in Versetta Stone installation. Significant variations in the wall’s plane can lead to inconsistent mortar coverage, gaps between stones, and an overall unprofessional appearance. Addressing this requires careful preparation before installation begins. Thorough surface preparation is key; using a level and shims to create a consistent plane will prevent issues later in the process. For severely uneven surfaces, consider using a leveling compound to achieve a smoother base.
Cracking
Cracking can occur during installation or after completion, stemming from several factors. Improper mortar mixing, excessive force during installation, or underlying wall movement can all contribute. To minimize cracking, ensure the mortar is mixed according to the manufacturer’s instructions, avoiding overly dry or wet consistency. Gentle placement of the stones is vital; avoid forcing them into place. If cracking does occur, carefully remove the affected stone, prepare the area appropriately, and reinstall using the correct techniques.
Inconsistent Color
Variations in stone color are inherent to natural materials like Versetta Stone. However, significant inconsistencies can detract from the overall aesthetic. This is often caused by mixing stones from different production batches. To ensure color consistency, purchase sufficient stone for the entire project from a single batch. If using multiple batches is unavoidable, carefully blend the stones during installation to minimize noticeable differences. Laying out the stones before installation can help identify and address color variations.
Mortar Stains
Mortar stains can mar the finished appearance if not properly addressed. Excess mortar squeezed out between stones can dry and leave unsightly marks. Preventing this requires careful application of mortar, using a consistent amount and immediately removing any excess with a damp sponge before it sets. For stubborn stains, a gentle cleaning solution designed for stone may be necessary, but always test it on an inconspicuous area first.
Troubleshooting Guide
| Problem | Solution |
|---|---|
| Uneven Surfaces | Use a level and shims to create a consistent plane before installation. Consider a leveling compound for severely uneven surfaces. |
| Cracking | Mix mortar correctly, avoid excessive force during installation, and address any underlying wall movement. Remove and replace cracked stones carefully. |
| Inconsistent Color | Purchase sufficient stone from a single batch. If using multiple batches, carefully blend stones during installation. Pre-lay stones to identify and address variations. |
| Mortar Stains | Remove excess mortar immediately with a damp sponge. Use a gentle stone cleaning solution for stubborn stains (test in an inconspicuous area first). |
Finishing Touches and Maintenance
The final stages of your Versetta Stone installation are crucial for achieving a professional, long-lasting finish and ensuring years of enjoyment. Proper caulking and sealing protect against moisture damage, while regular maintenance safeguards the stone’s beauty and integrity. Neglecting these steps can lead to premature deterioration and costly repairs.
Proper sealing and caulking are essential to prevent water intrusion behind the stone veneer. This is especially important in areas prone to moisture, such as around windows, doors, and ground-level installations. Caulking creates a waterproof barrier, while sealing protects the stone itself from staining and weathering. These final steps are the difference between a stunning, durable installation and one that quickly shows signs of wear and tear.
Caulking and Sealing Procedures
Caulking should be applied to all joints and seams where the Versetta Stone meets other building materials, such as window frames, siding, or the foundation. Use a high-quality, paintable exterior-grade caulk that is compatible with both the stone and the adjacent materials. Apply the caulk neatly, using a caulking gun and smoothing it with a wet finger or a caulking tool to create a smooth, even bead. Allow the caulk to fully cure before painting, if necessary. Sealing the stone itself with a penetrating sealant further protects it from water damage and staining. Apply the sealant according to the manufacturer’s instructions, ensuring even coverage. This extra layer of protection is particularly beneficial in harsh climates or areas with high humidity. Remember to choose a sealant compatible with the Versetta Stone’s finish.
Long-Term Maintenance Strategies
Regular cleaning and inspection are key to maintaining the appearance and longevity of your Versetta Stone. A simple cleaning routine can prevent dirt and grime buildup, while regular inspections can identify and address minor issues before they become major problems. Consider this an investment that pays off in the long run, ensuring your Versetta Stone remains a beautiful and valuable asset to your property for years to come. Ignoring maintenance can lead to the need for costly repairs or even premature replacement.
Recommended Cleaning Products and Procedures
Proper cleaning is vital for maintaining the beauty and longevity of your Versetta Stone. Avoid harsh chemicals and abrasive cleaners, as these can damage the stone’s surface. Instead, opt for gentle cleaning solutions and techniques.
- Mild Detergent Solution: Mix a small amount of mild dish soap with warm water. Apply the solution using a soft-bristled brush or sponge, gently scrubbing the stone’s surface. Rinse thoroughly with clean water and allow to air dry.
- Pressure Washing (Low Pressure): For more stubborn dirt and grime, a low-pressure power washer can be effective. Maintain a safe distance from the stone to avoid damaging it. Always test a small, inconspicuous area first to ensure the pressure won’t harm the stone or its sealant.
- Avoid Abrasive Cleaners: Do not use abrasive cleaners, scouring pads, or wire brushes, as these can scratch the stone’s surface.
- Regular Inspection: Regularly inspect your Versetta Stone for any signs of damage, such as loose stones or cracks. Address any issues promptly to prevent further damage.
Cost and Budgeting: Versetta Stone Installation
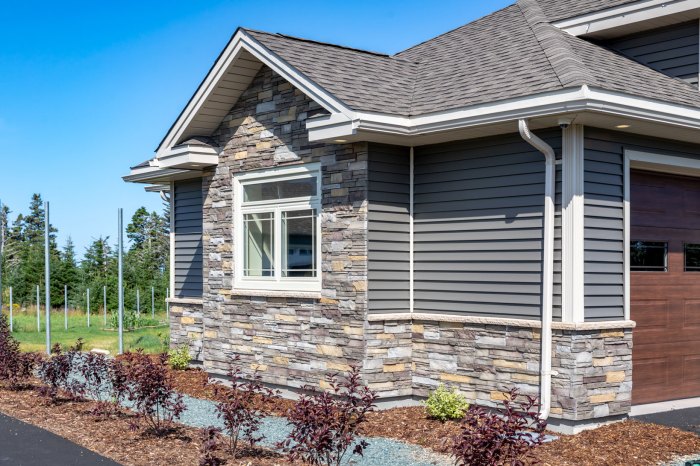
Planning a Versetta Stone project requires careful consideration of the associated costs. Understanding the various factors that influence the final price will help you create a realistic budget and avoid unexpected expenses. This section breaks down the typical costs, providing you with the information needed to make informed decisions.
The overall cost of a Versetta Stone installation is influenced by several key factors. These factors interact to determine the final price, making accurate budgeting crucial for successful project completion. Understanding these variables allows for more precise cost estimation and better financial planning.
Material Costs
Versetta Stone pricing varies depending on the chosen style, color, and quantity needed. The cost per square foot can range significantly, from a few dollars to over $20, depending on the specific product line. Additional materials like mortar, sealant, and other necessary tools will also add to the overall material expense. For a 100 sq ft project, materials might cost between $500 and $2000, depending on the chosen stone. Always request detailed quotes from multiple suppliers to compare prices.
Labor Costs
Labor costs are a significant portion of the total project expense. The hourly rate for experienced installers can vary based on location and project complexity. A simple installation might cost less per square foot than a complex project requiring extensive cutting, fitting, or intricate designs. Expect to pay anywhere from $10 to $30 or more per hour, depending on your location and the installer’s experience. A 100 sq ft project could range from $500 to $1500 in labor costs. Getting multiple quotes from reputable installers is vital to secure competitive pricing.
Permitting Costs
Depending on your location and the scope of the project, obtaining necessary permits might be required. Permitting costs vary widely, ranging from a few hundred dollars to potentially thousands, depending on local regulations and the project’s size and complexity. Check with your local building department to understand the specific requirements and associated fees.
Project Size and Complexity
The size of the area to be covered directly impacts material and labor costs. Larger projects naturally require more materials and more labor hours, leading to a higher overall cost. Similarly, complex designs, intricate cuts, or unusual architectural features will increase both material and labor costs. A small accent wall will cost significantly less than a full house cladding project.
Sample Budget
| Project Size (sq ft) | Materials (Estimate) | Labor (Estimate) | Permits (Estimate) |
|---|---|---|---|
| 50 | $250 – $1000 | $250 – $750 | $50 – $200 |
| 100 | $500 – $2000 | $500 – $1500 | $100 – $400 |
| 200 | $1000 – $4000 | $1000 – $3000 | $200 – $800 |
| 500 | $2500 – $10000 | $2500 – $7500 | $500 – $2000 |
Note: These are estimates only. Actual costs can vary depending on location, material choices, and project complexity. Always obtain multiple quotes from reputable contractors to get a precise estimate for your specific project.
Visual Examples
Versetta Stone’s visual impact extends far beyond its individual pieces; it’s about how the material interacts with architectural styles, lighting, and the overall design aesthetic to create a stunning exterior. Understanding these visual dynamics is crucial for maximizing the product’s potential and achieving the desired aesthetic. The following sections explore how Versetta Stone’s color, texture, and pattern contribute to diverse design projects.
Versetta Stone in Different Architectural Styles
Versetta Stone’s versatility allows it to seamlessly integrate into a wide range of architectural styles. For instance, its natural stone look complements traditional homes, adding a touch of rustic charm. The clean lines and consistent patterns of certain Versetta Stone profiles can equally enhance modern designs, contributing a sophisticated, minimalist feel. In craftsman-style homes, the varied textures and colors of Versetta Stone can add depth and visual interest, echoing the handcrafted details characteristic of the style. Even in contemporary settings, strategically chosen Versetta Stone colors and patterns can create stunning focal points or subtle textural accents. The ability to mimic various natural stones allows for a cohesive look regardless of the home’s architectural style.
Detailed Descriptions of Versetta Stone Installations
Consider a farmhouse-style home clad in a warm, earthy-toned Versetta Stone. The subtle variations in color and texture create a sense of depth and authenticity, mimicking the look of natural stone without the high cost and maintenance. The horizontal installation pattern accentuates the home’s length, creating a feeling of spaciousness. Alternatively, a modern home might feature a sleek, grey Versetta Stone installation with a vertical pattern, emphasizing height and creating a striking visual contrast against the clean lines of the architecture. The use of contrasting grout colors can further enhance the design, creating a more pronounced pattern or highlighting the individual stones. In another example, a Mediterranean-style home might benefit from a lighter-colored Versetta Stone, perhaps in a stacked-bond pattern, to create a bright and airy feel, echoing the sun-drenched aesthetic of the region.
Lighting Conditions and Versetta Stone Appearance
Lighting plays a crucial role in how Versetta Stone appears. Natural daylight can highlight the subtle color variations and textures within the stone, creating a dynamic and ever-changing facade throughout the day. The angle of the sun will impact the shadows and highlights, adding depth and dimension. Conversely, artificial lighting can create a different mood. Warm-toned lighting can enhance the richness and warmth of certain Versetta Stone colors, while cooler lighting can emphasize the stone’s texture and create a more contemporary feel. Proper lighting design is essential to showcase Versetta Stone’s visual appeal, whether highlighting specific architectural features or creating a welcoming ambiance for the entire home. For instance, strategically placed uplighting can accentuate the textures and create dramatic shadows, while softer ambient lighting can showcase the overall color and pattern.
Mastering Versetta Stone installation is about more than just following instructions; it’s about understanding the nuances of the material and the intricacies of the process. From the initial planning stages to the final finishing touches, each step plays a vital role in achieving a stunning and long-lasting result. By carefully considering material selection, preparing the surface meticulously, and employing the correct installation techniques, you can transform your home’s exterior with a beautiful and durable Versetta Stone cladding. Remember, attention to detail is key to a successful project that will enhance your home’s aesthetic appeal and increase its value for years to come. So, are you ready to get started?
Commonly Asked Questions
Can I install Versetta Stone over existing siding?
Generally, yes, but the existing siding must be sound and securely attached. Check for rot, damage, or loose boards. Proper preparation is crucial for a successful installation.
How long does Versetta Stone installation typically take?
The installation time varies depending on the project size and complexity. Smaller projects might take a weekend, while larger ones could take several days or even weeks.
What’s the best way to clean Versetta Stone?
Use a mild detergent and water solution. Avoid abrasive cleaners or high-pressure washers that could damage the surface.
Does Versetta Stone require sealing?
While not always strictly necessary, sealing can enhance its water resistance and longevity, especially in harsh climates. Check the manufacturer’s recommendations for your specific product.
Is Versetta Stone a DIY-friendly project?
While it’s possible for experienced DIYers, it’s a relatively complex project. If you lack experience, hiring a professional installer is recommended to ensure a quality result.
