Stone Facing for House A Complete Guide
Stone facing for house exteriors offers a timeless elegance and durability that few other materials can match. But choosing the right stone, understanding installation, and considering long-term maintenance are crucial for a successful project. This guide dives deep into every aspect, from selecting the perfect stone type and finish to budgeting, installation techniques, and even the environmental impact of your choice. We’ll cover everything you need to know to transform your home’s exterior with stunning stone facing.
From granite’s robust strength to the softer elegance of limestone, we’ll explore a variety of stone options, comparing their costs, durability, and aesthetic appeal. We’ll also walk you through the installation process step-by-step, offering practical tips and tricks to ensure a flawless finish. Learn how to choose stone that complements your home’s architectural style and surrounding landscape, and discover how to maintain your stone facing for years to come.
Types of Stone Facing
Choosing the right stone facing for your home is a crucial decision impacting both aesthetics and longevity. The wide variety of options available, each with unique properties and price points, can be overwhelming. This section delves into the specifics of several popular stone facing materials, offering a comprehensive comparison to aid in your selection process.
Stone Facing Material Properties
Stone facing offers a timeless elegance and durability that many other cladding materials can’t match. However, different stone types possess varying degrees of hardness, maintenance needs, and aesthetic qualities. Understanding these differences is vital for making an informed choice. Factors like climate, desired aesthetic, and budget significantly influence the best stone selection for a specific project.
Granite
Granite, an igneous rock, is renowned for its exceptional durability and resistance to weathering. Its inherent strength makes it ideal for high-traffic areas and harsh climates. Granite’s rich colors and distinctive patterns provide a luxurious aesthetic. However, its hardness necessitates professional installation, and its cost is generally higher compared to other options. Common finishes include polished, honed, and flamed. A polished finish provides a high-gloss sheen, a honed finish offers a matte look, while a flamed finish creates a textured surface.
Marble
Marble, a metamorphic rock, is celebrated for its elegant veining and soft, luxurious feel. Its beauty makes it a popular choice for interior and exterior applications, though it is less durable than granite and requires more careful maintenance. Marble is susceptible to etching from acidic substances and requires sealing to protect against staining. Finishes range from polished to honed, with polished marble exhibiting a high shine and honed marble presenting a softer, matte appearance.
Limestone, Stone facing for house
Limestone, a sedimentary rock, offers a classic, timeless appeal. Its porous nature requires regular sealing to prevent water damage and staining. While generally less expensive than granite or marble, limestone’s softer texture makes it more susceptible to scratching and wear. Finishes include tumbled (a smooth, slightly worn look), honed (matte), and polished (high-gloss).
Sandstone
Sandstone, another sedimentary rock, presents a warm, earthy aesthetic. Its relatively soft nature makes it easier to work with and often more affordable than other stone types. However, it’s more prone to weathering and requires regular sealing and maintenance. Common finishes include tumbled, honed, and sawn (a rougher, more textured finish).
Veneer
Stone veneer is a thinner, more cost-effective alternative to solid stone. It offers a similar aesthetic appeal but weighs significantly less, reducing installation costs and structural demands. However, veneer’s durability is generally less than that of solid stone, and it may require more frequent maintenance. The available finishes depend on the underlying stone type used in the veneer.
Stone Facing Comparison Table
| Stone Type | Cost (Relative) | Durability | Maintenance | Aesthetic Appeal |
|---|---|---|---|---|
| Granite | High | Very High | Low | Classic, Elegant |
| Marble | High | Medium | Medium-High | Luxurious, Veined |
| Limestone | Medium | Medium | Medium-High | Classic, Warm |
| Sandstone | Medium-Low | Medium-Low | High | Earthy, Rustic |
| Veneer | Low | Low-Medium | Medium | Versatile, Cost-Effective |
Installation Methods
Installing stone veneer on your home’s exterior is a rewarding project that can significantly enhance its curb appeal and value. However, proper installation is crucial for longevity and aesthetic appeal. This section details the step-by-step process, ensuring a professional-looking finish that withstands the test of time. Remember, always consult local building codes and consider hiring a professional for complex installations or large projects.
Successful stone veneer installation hinges on meticulous preparation and precise execution. From surface preparation to the final touches, each step contributes to the overall durability and beauty of the finished product. Ignoring any of these steps can lead to problems ranging from poor adhesion to structural damage.
Surface Preparation
Thorough surface preparation is paramount. This involves cleaning the wall to remove any loose debris, dirt, or old paint. Any cracks or imperfections in the underlying wall should be repaired using appropriate patching materials. A clean, even surface ensures optimal adhesion of the stone veneer. This stage is often overlooked, but it directly impacts the longevity of the installation. For instance, failing to remove loose paint can lead to the veneer peeling off over time. Similarly, unaddressed cracks can propagate, causing the veneer to crack or break. Finally, ensure the surface is dry before proceeding; moisture can severely compromise the bond.
Application Techniques
Stone veneer is typically installed using a mortar bed. The mortar, a mixture of cement, sand, and water, is applied to the prepared wall surface in sections. The stone pieces are then embedded into the wet mortar, ensuring full contact. A thin layer of mortar is also applied to the back of each stone piece before placement. This “back-buttering” technique further enhances adhesion and helps fill any gaps between stones. The key is to work methodically, ensuring consistent mortar coverage and proper placement of each stone. Different types of stone may require slightly different application techniques, so always refer to the manufacturer’s instructions.
Necessary Tools
A successful installation requires the right tools. These include a trowel for applying mortar, a level to ensure even placement, a plumb bob for vertical alignment, a measuring tape for accurate spacing, a rubber mallet for gently tapping stones into place, a grout float for filling gaps, and safety glasses and gloves for protection. Investing in high-quality tools will make the installation process smoother and yield a superior result. Using inferior tools can lead to frustration and a subpar finish. For example, a poorly designed trowel can make applying a consistent layer of mortar difficult.
Visual Guide to Stone Veneer Installation
The following steps illustrate the typical installation process. Note that specific techniques may vary depending on the type of stone and the complexity of the project.
- Step 1: Surface Preparation: Illustrative image: A close-up showing a clean, prepared wall surface, free of debris and with any cracks repaired. Caption: A meticulously cleaned and repaired wall surface is the foundation for a successful installation.
- Step 2: Mortar Application: Illustrative image: A mason applying mortar to a section of the wall with a trowel. Caption: Applying a consistent layer of mortar ensures proper adhesion of the stone veneer.
- Step 3: Stone Placement: Illustrative image: A stone being carefully placed into the wet mortar, ensuring full contact. Caption: Each stone should be firmly embedded in the mortar, with full contact to prevent shifting.
- Step 4: Back-Buttering: Illustrative image: A close-up of a stone with mortar applied to its back. Caption: Back-buttering the stones enhances adhesion and fills gaps between stones.
- Step 5: Grouting: Illustrative image: Filling the gaps between stones with grout using a grout float. Caption: Grouting creates a uniform and professional look while protecting the wall.
- Step 6: Finishing Touches: Illustrative image: The completed stone veneer installation. Caption: The finished installation showcases a seamless blend of stone and wall.
Best Practices for Adhesion and Damage Prevention
Maintaining proper adhesion and preventing cracking is key to a long-lasting installation. Consistent mortar application, proper stone placement, and the use of appropriate expansion joints are vital. Expansion joints accommodate the natural movement of the building and the stone itself, preventing cracking due to thermal expansion and contraction. Avoid using excessive force when placing stones; gentle tapping with a rubber mallet is usually sufficient. Using high-quality mortar and adhering to the manufacturer’s recommendations for curing time are also crucial factors. Neglecting these practices can lead to premature cracking and deterioration of the veneer. For example, omitting expansion joints can result in significant cracking during temperature fluctuations.
Design Considerations
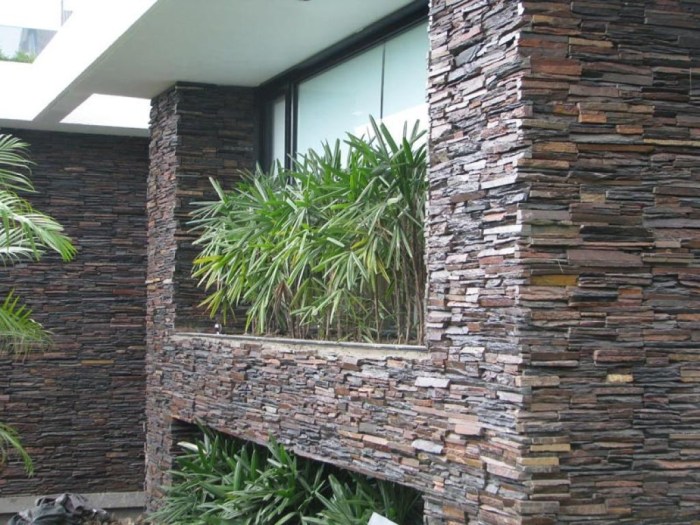
Choosing the right stone facing goes far beyond simply picking a pretty rock. The aesthetic impact of your selection will significantly influence your home’s curb appeal and overall value. Careful consideration of color, texture, and style is crucial to achieving a cohesive and visually stunning result. This section delves into the key design elements to help you make informed decisions.
Stone Color and Texture Influence on Aesthetics
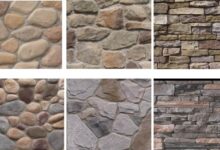
The color and texture of your stone facing dramatically affect the mood and style of your home. Light-colored stones, such as beige limestone or white marble, create a bright, airy feel, often associated with Mediterranean or modern styles. They reflect light, making the house appear larger and brighter, especially effective in shaded areas. Conversely, dark-colored stones like dark grey granite or black basalt project a sense of drama and sophistication, ideal for contemporary or even gothic architectural styles. Their ability to absorb light can create a more intimate and grounded feeling. Texture plays a crucial role as well. Smooth, polished stones lend a sleek, contemporary look, while rough-hewn or tumbled stones convey a rustic, traditional charm. Imagine a home clad in smooth, grey granite, exuding modern elegance, compared to one featuring rough-hewn sandstone, evoking a sense of warmth and history. The interplay between color and texture is key to creating the desired atmosphere.
Design Styles and Stone Facing Integration
Different architectural styles benefit from specific stone facing choices. Traditional homes often feature stone accents that complement classic designs. A brick home with limestone or granite detailing around the entryway or foundation, for instance, embodies a timeless elegance. Imagine a picture: a two-story colonial-style house with a meticulously manicured lawn, featuring a light grey granite foundation and matching window surrounds, creating a refined and balanced aesthetic. In contrast, modern homes frequently incorporate sleek, minimalist stone designs. Clean lines and monochromatic color palettes are often preferred, with materials like polished concrete or dark grey slate creating a striking visual contrast. A visualization: a sharp, angular modern home with a dark grey slate façade, large windows, and minimalist landscaping—a powerful example of contemporary design. Rustic styles often utilize natural, rough-hewn stones like fieldstone or stacked stone to achieve a cozy, lived-in look. Picture a charming mountain cabin with walls clad in varied shades of brown and beige fieldstone, blending seamlessly with the surrounding natural environment. The choice of stone directly reflects the architectural style and desired ambiance.
Choosing Stone to Complement Architecture and Landscape
Harmonizing the stone facing with the home’s architecture and the surrounding landscape is paramount. The style of the home should guide the choice of stone. A Victorian-era home would be ill-suited to a stark, modern stone, while a contemporary structure might look out of place with rustic fieldstone. Similarly, the surrounding landscape should inform the selection. A home nestled in a lush, green environment might benefit from earth-toned stones that blend naturally with the foliage. Conversely, a home situated in a desert landscape might look more appropriate with lighter-colored stones that reflect the sun’s heat. Consider the existing materials on the house; using complementary stone can create a cohesive and visually appealing design. For example, a home with red brick might use a similar red or brown stone for accents to maintain a unified look. The careful integration of stone facing enhances the home’s overall aesthetic appeal and creates a harmonious relationship between the structure and its surroundings.
Maintenance and Repair
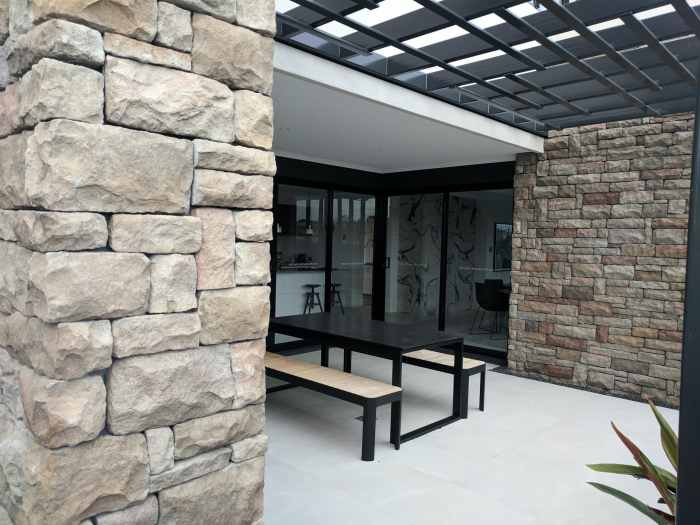
Proper maintenance is crucial for preserving the beauty and longevity of your stone facing. Neglecting upkeep can lead to costly repairs down the line, significantly impacting the aesthetic appeal and structural integrity of your home. Regular cleaning and prompt attention to damage are key to maintaining your investment.
Stone facing, while durable, requires specific care depending on the type of stone used. Different stones have varying levels of porosity and susceptibility to staining, demanding tailored cleaning methods to avoid damage. Understanding these nuances is essential for effective maintenance.
Cleaning and Maintaining Different Stone Types
Cleaning methods vary significantly depending on the stone type. Limestone, for instance, is more porous than granite and requires gentler cleaning to avoid etching. Sandstone is relatively soft and susceptible to abrasion, necessitating careful cleaning techniques. Here’s a breakdown of cleaning methods for common stone types:
- Limestone: Use a soft-bristled brush and a mild detergent solution. Avoid acidic cleaners, which can etch the surface. Rinse thoroughly with clean water.
- Granite: Granite is more resistant to staining and etching than limestone. A simple solution of warm water and mild soap is usually sufficient. For stubborn stains, a specialized granite cleaner may be necessary.
- Sandstone: Because of its softness, use only a very soft brush and a mild, pH-neutral cleaner. Avoid pressure washing, which can damage the surface.
- Marble: Marble is sensitive to acidic substances. Use only pH-neutral cleaners and avoid harsh scrubbing. Regular sealing is recommended to protect against stains.
Common Problems and Solutions
A proactive approach to maintenance can prevent many issues. However, some problems are inevitable. Knowing how to address these issues promptly can save you significant time and money.
| Problem | Solution |
|---|---|
| Efflorescence (white powdery deposits) | Clean with a stiff brush and water. In severe cases, a solution of muriatic acid (diluted carefully and with appropriate safety precautions) may be necessary, followed by thorough rinsing. |
| Staining | Address stains promptly. For oil-based stains, use a commercial stone cleaner designed for oil removal. For water-based stains, allow them to dry completely before cleaning with a soft brush and water. |
| Cracking or Chipping | Repair or replace damaged stones. Consult a professional stonemason for larger repairs or structural concerns. |
| Algae or Mold Growth | Clean with a solution of bleach and water (following manufacturer’s instructions carefully). For persistent growth, consider using a specialized stone cleaner with biocidal properties. |
| Loose or Missing Mortar | Repoint the mortar using a matching type. Consult a professional mason for larger areas or structural concerns. |
Repairing Damaged Stone Facing
Repairing damaged stone facing involves several steps, depending on the extent of the damage. Minor chips or cracks can often be repaired with epoxy resin matched to the stone’s color. Larger areas of damage may require replacing individual stones or sections of the facing. This typically necessitates the expertise of a qualified stonemason. For example, a severely cracked stone might require careful removal, precise matching of a replacement stone, and meticulous re-installation to maintain the integrity of the facing. The process involves careful matching of color and texture, precise cutting and fitting, and the use of appropriate mortar to ensure a seamless repair. For significant damage, a professional assessment is crucial to determine the best course of action.
Cost and Budgeting
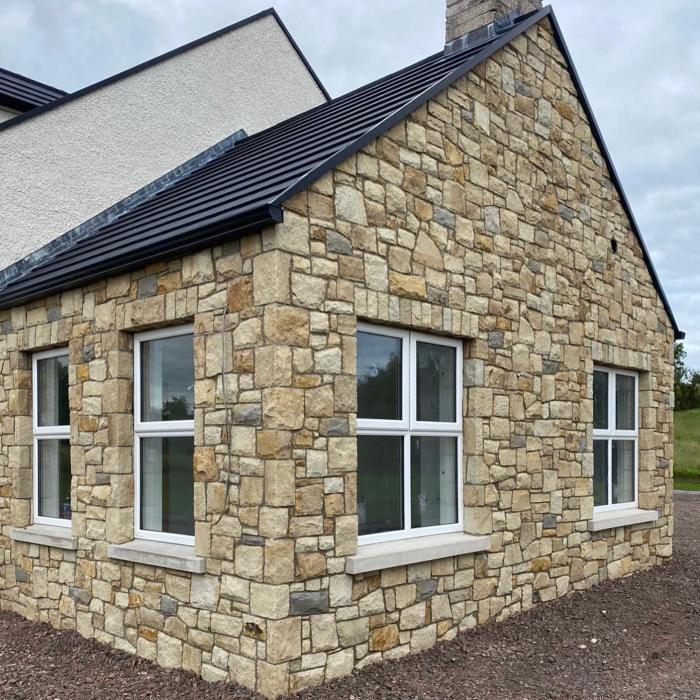
Planning the budget for your stone facing project is crucial for a successful outcome. Accurate cost estimation involves considering materials, labor, and permits, and understanding how these factors can influence the overall expense. Failing to account for all costs can lead to significant budget overruns and project delays.
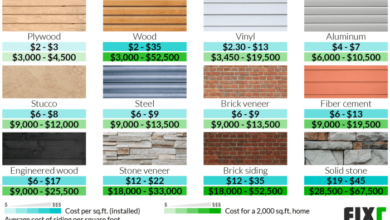
Estimating the overall cost requires a breakdown of individual components. First, determine the square footage of the area to be faced. Then, research the cost per square foot of your chosen stone type, remembering that prices vary widely based on the stone’s origin, quality, and finish. Factor in additional materials like mortar, flashing, and any necessary underlayment. Labor costs will depend on the complexity of the project and your chosen installer’s rates; obtain multiple quotes to compare. Finally, check with your local authorities for permit fees, which can vary considerably depending on location and project scope.
Estimating Project Costs
Let’s illustrate with a sample calculation. Assume you’re facing 500 square feet of exterior wall with a medium-grade limestone costing $10 per square foot. Materials, including mortar and flashing, might add another $2 per square foot. Labor, based on three quotes averaging $8 per square foot, totals $4000. Permits are estimated at $500. The total estimated cost would be: (500 sq ft * $10/sq ft) + (500 sq ft * $2/sq ft) + $4000 + $500 = $12,000. This is a simplified example; actual costs can fluctuate based on numerous factors.
Cost-Effective Stone Facing Options
Finding cost-effective options doesn’t necessitate sacrificing quality. Consider using less expensive stone types, such as manufactured stone veneer, which often mimics the look of natural stone at a fraction of the cost. Explore regional quarries or suppliers for potentially lower prices on locally sourced materials, reducing transportation costs. Opting for a simpler installation design, minimizing intricate cuts and detailing, can also significantly reduce labor expenses. Careful planning and efficient material usage can minimize waste and keep costs down. For instance, using reclaimed stone can drastically reduce the overall material costs.
Financing Options for Stone Facing Projects
Several financing options exist for home improvement projects. Home equity loans or lines of credit (HELOCs) allow you to borrow against your home’s equity. Personal loans offer another avenue, with varying interest rates and repayment terms depending on your creditworthiness. Some contractors offer financing plans, allowing you to pay for the project over time. Finally, credit cards can provide short-term financing, though high-interest rates should be carefully considered. Before committing to any financing option, thoroughly compare interest rates, fees, and repayment terms to choose the most suitable solution for your financial situation. Remember to factor in the total cost of borrowing, including interest, when budgeting for your project.
Environmental Impact: Stone Facing For House
Choosing stone facing for your home involves more than just aesthetics; it carries significant environmental implications throughout its lifecycle, from sourcing to disposal. Understanding these impacts is crucial for making informed, sustainable choices. The environmental footprint of stone facing varies greatly depending on the type of stone, its origin, and the methods used for extraction, transportation, and installation.
The environmental impact of stone facing encompasses several key areas. Sourcing materials often involves quarrying, a process that can lead to habitat destruction, soil erosion, and water pollution. Transportation of the stone, often over long distances, contributes to greenhouse gas emissions. Finally, the disposal of stone facing at the end of a building’s lifespan can also present environmental challenges. Let’s delve deeper into these aspects.
Stone Sourcing and Transportation
The environmental burden associated with stone extraction and transportation varies significantly depending on the stone type and its geographical origin. Locally sourced stone generally has a smaller carbon footprint than stone transported across continents. For instance, using limestone quarried within a 100-mile radius of a construction site will have a considerably lower transportation-related carbon footprint than granite imported from another country. Furthermore, the quarrying process itself can have varying levels of environmental impact. Some quarries employ more sustainable practices than others, minimizing habitat disruption and water pollution. The energy consumption associated with quarrying and processing also contributes to the overall environmental impact. For example, the energy required to extract and process granite, a very hard stone, is significantly higher than that for softer stones like sandstone.
Sustainable and Eco-Friendly Stone Facing Options
Fortunately, several sustainable and eco-friendly options exist for stone facing. Recycled stone, salvaged from demolition projects or repurposed from other sources, significantly reduces the environmental impact compared to newly quarried stone. Locally sourced stone minimizes transportation emissions. Choosing stones with lower embodied energy, such as readily available and easily processed materials, is another important consideration. Furthermore, using thinner stone veneers can reduce material consumption and transportation needs. The use of sustainably harvested and certified wood for supporting structures can also improve the overall sustainability of the project. For example, a project using reclaimed brick and locally sourced slate would have a considerably smaller footprint than one using imported marble and concrete.
Energy Efficiency Benefits of Stone Facing
Stone facing can contribute to a building’s energy efficiency, though the extent depends on several factors. Stone’s thermal mass can help regulate indoor temperatures, reducing the need for heating and cooling. This is particularly beneficial in climates with significant temperature fluctuations. However, the energy efficiency benefits can be offset by the energy consumed during the stone’s lifecycle – from extraction to transportation and installation. The thermal performance of the stone itself is also crucial; a highly insulating stone will offer better energy efficiency than one with poor insulation properties. Darker colored stones can absorb more solar radiation, potentially increasing the cooling load in warmer climates. Conversely, lighter colored stones can reflect more sunlight, reducing cooling needs. A well-insulated building using locally sourced stone with high thermal mass will likely exhibit significant energy efficiency gains.
Ultimately, choosing stone facing for your house is a significant investment that can dramatically enhance your home’s curb appeal and value. By carefully considering the factors Artikeld in this guide—from material selection and installation to long-term maintenance and environmental impact—you can make informed decisions that ensure a beautiful, durable, and sustainable outcome. Remember to prioritize quality materials and skilled installation for a project that will stand the test of time and add lasting beauty to your home.
Question & Answer Hub
What’s the average lifespan of stone facing?
With proper installation and maintenance, stone facing can last for decades, even a century or more for durable stones like granite.
Can I install stone facing myself?
While possible for smaller projects, professional installation is generally recommended, especially for larger areas or complex designs. Improper installation can lead to damage and costly repairs.
How do I clean different types of stone facing?
Cleaning methods vary depending on the stone type. Always check the manufacturer’s recommendations. Generally, mild soap and water are suitable for most stones, while tougher stains might require specialized cleaners.
Is stone facing suitable for all climates?
Most stone types are weather-resistant, but some are more suitable for certain climates than others. For example, porous stones might not be ideal in areas with frequent freezing and thawing.
What are the potential risks associated with DIY stone facing installation?
Risks include improper adhesion leading to cracking or falling stones, incorrect cutting resulting in uneven surfaces, and injury from using power tools. Professional installation mitigates these risks.
