Hardie Plank Installation A Complete Guide
Hardie Plank installation: Transforming your home’s exterior with this durable siding requires careful planning and execution. From selecting the right type of Hardie Plank to mastering the installation techniques, this guide provides a comprehensive walkthrough, ensuring a flawless finish that enhances your home’s curb appeal and longevity. We’ll cover everything from pre-installation prep to post-installation maintenance, equipping you with the knowledge to tackle this project confidently. This isn’t just about slapping up some siding; it’s about building a lasting, beautiful exterior.
This detailed guide breaks down the entire Hardie Plank installation process into manageable steps. We’ll explore the various Hardie Plank options, helping you choose the perfect fit for your project. Then, we’ll delve into the practical aspects of installation, covering tools, techniques, and troubleshooting common issues. By the end, you’ll have the confidence to tackle this project yourself or effectively oversee a professional installation.


Hardie Plank Product Overview

Hardie Plank siding, manufactured by James Hardie, is a popular choice for homeowners seeking durable and aesthetically pleasing exterior cladding. Understanding the different types available, their respective strengths and weaknesses, and the warranty offered is crucial for making an informed decision. This overview will provide a comprehensive look at the key features of several Hardie Plank products.
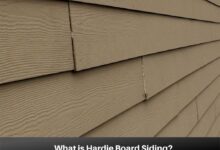
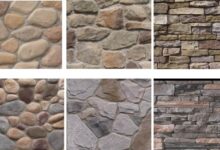
Hardie Plank Siding Types
James Hardie offers a range of fiber cement siding products under the Hardie Plank brand, each designed to meet specific needs and budgets. These variations primarily differ in their texture, thickness, and overall performance characteristics. Key product lines include HardiePlank® Lap Siding, HardiePlank® Cedarmill, and HardiePlank® Artisan.
Advantages and Disadvantages of Hardie Plank Siding Types
Each Hardie Plank product offers a unique set of advantages and disadvantages. For example, HardiePlank Lap Siding, known for its classic look, provides excellent durability but might require more precise installation than other options. Conversely, HardiePlank Cedarmill, with its wood-like texture, offers a visually appealing alternative but may be slightly more expensive. The thicker profiles, such as Artisan, provide superior impact resistance but at a higher cost. A thorough understanding of these trade-offs is essential for optimal selection.
James Hardie Warranty
James Hardie provides a comprehensive warranty for its Hardie Plank siding products. The specifics of the warranty may vary depending on the product and region, but generally cover defects in materials and workmanship. It’s crucial to review the specific warranty document provided with your purchase to understand the full scope of coverage and any limitations. The warranty typically includes a non-prorated period for defects, followed by a prorated period, which means the manufacturer’s responsibility decreases over time.
Hardie Plank Product Comparison
The following table compares three popular Hardie Plank siding options: HardiePlank Lap Siding, HardiePlank Cedarmill, and HardiePlank Artisan. Remember that actual costs can vary depending on location, labor, and other factors.
| Feature | HardiePlank Lap Siding | HardiePlank Cedarmill | HardiePlank Artisan |
|---|---|---|---|
| Durability | High; resists rot, insects, and fire | High; resists rot, insects, and fire | Very High; thicker profile offers superior impact resistance |
| Cost | Mid-range | Higher than Lap Siding | Highest |
| Maintenance | Low; occasional cleaning | Low; occasional cleaning | Low; occasional cleaning |
Pre-Installation Preparation

Successful Hardie Plank installation hinges on meticulous pre-installation preparation. Failing to adequately prepare the surface and gather the necessary tools and materials can lead to delays, increased costs, and a subpar final product. This section details the critical steps to ensure a smooth and efficient installation process.
Necessary Tools and Materials
A comprehensive inventory of tools and materials is essential for a successful Hardie Plank installation. Omitting even a single item can significantly impact your workflow and potentially compromise the final result. Proper planning prevents costly delays and ensures a professional finish.
- Measuring tape: Accuracy is paramount; a high-quality, durable tape measure is crucial for precise measurements.
- Level: A reliable level, preferably a 4-foot level, is necessary for ensuring perfectly straight lines and plumb installations.
- Chalk line: A chalk line allows for quick and accurate marking of straight lines, guiding the placement of the Hardie Plank.
- Circular saw with fine-tooth blade: A circular saw with a fine-tooth blade specifically designed for cutting fiber cement is required for clean and precise cuts.
- Safety glasses and hearing protection: Protecting your eyes and ears is non-negotiable for safe operation of power tools.
- Hammer and nails (or nail gun): Appropriate fasteners are critical for secure attachment of the Hardie Plank to the building’s structure.
- Caulk gun and exterior-grade caulk: Caulk is necessary for sealing gaps and joints, ensuring weathertightness.
- Putty knife: Useful for applying and smoothing caulk, as well as for minor repairs to the existing siding.
- Ladder and scaffolding (if necessary): Safe and stable access to all areas of the building is paramount.
- Hardie Plank siding: Calculate the required amount carefully (see below).
- Starter strip and J-channel: These components are crucial for creating a neat and professional edge.
- Fasteners: Choose the correct type and length of nails or screws for your specific Hardie Plank and building material.
- Primer and paint (if needed): Properly priming and painting the Hardie Plank protects it from the elements and enhances its lifespan.
Surface Preparation
Thorough surface preparation is the cornerstone of a successful Hardie Plank installation. Neglecting this step can lead to issues with adhesion, compromising the longevity and aesthetics of the final product. The goal is to create a clean, dry, and even surface for the new siding.
This involves removing any loose or damaged existing siding, repairing any underlying structural issues (such as rotted wood), and thoroughly cleaning the surface to remove dirt, debris, and mildew. Any imperfections should be addressed before installing the Hardie Plank. Power washing is often necessary to achieve a thoroughly clean surface. Allow ample drying time after cleaning.
Measuring and Calculating Hardie Plank
Accurate measurement and calculation are crucial to avoid material waste and ensure you have enough Hardie Plank for the entire project. Improper calculation can lead to significant delays and extra expenses.
Begin by carefully measuring the total surface area of the walls to be sided. Account for windows, doors, and other openings. Consider the width and length of each Hardie Plank and calculate the number of planks needed per wall section. Always add extra material to account for cuts, waste, and potential errors. Consult the manufacturer’s specifications for exact dimensions and coverage information. For example, if a wall measures 10 feet high by 20 feet wide, and each plank is 12 inches wide, you would need approximately 200 linear feet of Hardie Plank (20ft x 10ft / 1ft). Remember to add extra for waste and cuts.
Preparing the Building’s Structure
Before installing Hardie Plank, ensure the building’s structure is properly prepared. This includes checking for any structural damage or issues that could affect the installation. Any necessary repairs should be completed before starting the siding installation. Ensure that the sheathing is sound and securely fastened. This prevents future problems and ensures a long-lasting, secure installation. A poorly prepared structure can compromise the integrity of the Hardie Plank installation, leading to potential problems down the line.
Installation Techniques: Hardie Plank Installation

Installing HardiePlank siding is a straightforward process, but meticulous attention to detail ensures a long-lasting, beautiful finish. Proper installation techniques are crucial for maximizing the product’s lifespan and warranty coverage. This section details the step-by-step procedure, focusing on critical aspects like starting the first course, managing cuts around openings, and maintaining consistent alignment and fastening.
Installing the First Course of HardiePlank
The first course sets the foundation for the entire siding installation. Begin at a corner, ensuring a level and plumb starting point. Use a level to establish a perfectly horizontal line along which the first plank will be installed. This initial course acts as a reference point for all subsequent courses, so accuracy is paramount. Proper alignment and spacing here significantly impact the overall aesthetic appeal and structural integrity of the finished product. Pre-drilling pilot holes is recommended to prevent splitting the fiber cement material, especially when using nails near edges. Start at a corner and work your way across the wall, maintaining consistent spacing and ensuring the planks are securely fastened.
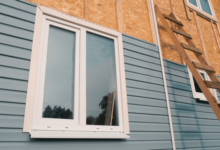
Cutting and Fitting HardiePlank Around Windows and Doors
Precise cuts are necessary for a professional finish around windows and doors. Measure carefully and use a sharp circular saw with a fine-tooth blade designed for cutting fiber cement. For intricate cuts, a jigsaw might be more suitable. Always wear appropriate safety gear, including eye protection and a dust mask. When fitting around window and door frames, consider using J-channel or trim to create a neat and weather-tight seal. Pre-cut pieces can be dry-fitted before final fastening to ensure a perfect fit. Remember to leave appropriate expansion gaps. For example, around a window frame, the gaps should be consistent with the manufacturer’s recommended spacing to allow for expansion and contraction due to temperature changes.
Ensuring Proper Alignment and Spacing
Maintaining consistent alignment and spacing between planks is essential for a visually appealing and structurally sound installation. Use a level and measuring tape frequently to check for alignment and spacing. Consistent spacing is typically achieved using spacers. The recommended spacing should be adhered to as per the manufacturer’s guidelines to allow for expansion and contraction. Inconsistent spacing can lead to buckling or gaps in the siding over time. Regularly checking alignment and spacing throughout the installation process will minimize the risk of costly rework.
Fastening HardiePlank Securely and Preventing Damage, Hardie plank installation
Secure fastening is critical for the longevity and performance of the HardiePlank siding. Use galvanized nails specifically designed for fiber cement, and always pre-drill pilot holes to prevent splitting. The nails should be driven straight and flush with the surface of the siding. Avoid over-driving nails, which can cause damage and compromise the structural integrity. The correct nail placement and penetration depth is crucial to prevent future problems such as nail pops. Always refer to the manufacturer’s instructions for specific nail type, spacing, and penetration depth requirements.
Installing Corner Trim and J-Channels
Proper installation of corner trim and J-channels ensures a clean, professional finish and protects the edges of the HardiePlank.
- Corner Trim: Measure and cut the corner trim to the desired length. Position the trim over the corner and fasten it securely using galvanized nails, ensuring that the nails are driven straight and flush with the surface. Overlapping the corner trim with the first course of HardiePlank ensures watertight protection.
- J-Channels: J-channels are typically used around windows and doors. Measure and cut the J-channel to the required length. Position the J-channel and fasten it securely using galvanized nails. Ensure that the J-channel is properly aligned and that the nails are driven straight and flush with the surface. This creates a neat and weather-resistant finish around openings.
Advanced Installation Considerations
Installing Hardie Plank siding on complex structures requires meticulous planning and execution. While the basic installation techniques are relatively straightforward, mastering the nuances involved in tackling challenging architectural features and mitigating environmental factors is crucial for a long-lasting, aesthetically pleasing finish. Ignoring these advanced considerations can lead to costly repairs and compromised structural integrity.
Hardie Plank Installation on Complex Building Structures
Installing Hardie Plank on dormers and gables presents unique challenges. Dormers, with their varied angles and intersecting planes, require precise measurements and cuts to ensure a seamless transition between the siding and the roofline. Similarly, gables demand careful planning around the peak, often involving intricate cuts and flashing to prevent water infiltration. Proper planning, including detailed mock-ups and precise measurements, is essential to avoid issues. Using pre-cut pieces where possible can simplify the process and minimize waste. For particularly complex angles, consider using a combination of standard and custom-cut pieces to achieve the best fit.
Managing Expansion and Contraction of Hardie Plank
Hardie Plank, like all building materials, expands and contracts with temperature fluctuations. Failure to account for this movement can result in buckling, cracking, and compromised weather protection. Proper spacing between planks, as specified by the manufacturer, is crucial. Additionally, using appropriate fasteners and allowing for sufficient expansion gaps at corners, around windows, and at other transitions is vital. Remember that Hardie Plank expands and contracts more in the length than the width, which influences nailing patterns and spacing. In climates with significant temperature swings, using corrosion-resistant fasteners is also highly recommended.
Common Mistakes and Solutions During Hardie Plank Installation
Several common mistakes can compromise the integrity and aesthetics of a Hardie Plank installation. One frequent error is inadequate flashing around windows and doors, leading to water damage. Another is improper nailing, resulting in loose planks and potential damage from wind uplift. Finally, neglecting to account for expansion and contraction can cause buckling and cracking. Solutions include careful planning, precise measurements, use of proper flashing, and adherence to manufacturer’s specifications for nailing patterns and spacing. Regular inspection during installation helps to catch and correct mistakes early on.
Comparison of Fastening Methods: Nails vs. Screws
Both nails and screws can be used to fasten Hardie Plank, each with its own advantages and disadvantages. Nails are generally faster and easier to install, but screws offer superior holding power, particularly in areas prone to high winds or significant temperature fluctuations. Screws also allow for easier adjustment if needed. The choice depends on the specific project requirements and the installer’s preference. However, using corrosion-resistant fasteners is crucial in all cases to ensure longevity and prevent premature failure. In high-wind areas, screws are generally preferred for their superior holding power.
Proper Flashing Installation Around Windows and Doors
Imagine a window framed by Hardie Plank. First, a continuous piece of flashing, ideally a flexible, waterproof membrane, is installed under the window sill, extending several inches beyond the window frame on both sides. This bottom flashing should slope downward to direct water away from the window. Next, side flashing pieces are installed vertically, overlapping the bottom flashing and extending up to meet the top flashing. The top flashing, similar to the bottom, extends beyond the window frame and overlaps the side flashings. Critically, all seams should be carefully sealed with a high-quality sealant to create a complete water barrier. The Hardie Plank is then installed over the flashing, ensuring proper overlap and sealing at all seams. This layered approach prevents water from penetrating behind the siding and causing damage to the underlying structure. A similar method is used around doors, ensuring continuous and effective water management.
Post-Installation Procedures
Successfully installing Hardie Plank siding is only half the battle. Proper post-installation procedures are crucial for ensuring the longevity and performance of your new siding. Neglecting these steps can lead to avoidable problems down the line, impacting both the aesthetic appeal and the structural integrity of your home. This section Artikels the essential steps to take after completing your Hardie Plank installation.
Site Cleanup
Thorough cleanup is paramount after any construction project. Remove all debris, including leftover planks, scraps, nails, and packaging materials. Sweep the surrounding areas to remove any loose particles. Proper disposal of waste materials is essential; follow local regulations for hazardous waste disposal if applicable. A clean site not only improves the overall appearance but also minimizes the risk of accidents and ensures a safe environment. Pay particular attention to removing any sharp objects that could pose a hazard.
Post-Installation Inspections and Quality Control
A comprehensive inspection is vital to identify and rectify any potential issues before they become major problems. This involves checking for gaps, misaligned planks, damaged sections, and ensuring all fasteners are properly secured. Inspect the caulking around windows and doors, checking for any gaps or imperfections. Take detailed photos of your work as documentation. Consider a second set of eyes—a friend or professional—to provide an objective assessment. Early detection of problems can prevent costly repairs later.
Maintaining Hardie Plank Siding
Hardie Plank siding is known for its durability, but regular maintenance is still necessary to ensure its long lifespan. Regularly inspect the siding for any signs of damage, such as cracks, loose planks, or discoloration. Clean the siding periodically with a soft brush and water to remove dirt and debris. For tougher stains, use a mild detergent solution. Avoid using high-pressure washers, as they can damage the siding. Annual inspections, especially after harsh weather, are highly recommended.
Troubleshooting Common Issues
Even with careful installation, minor issues can sometimes arise. Understanding common problems and their solutions is essential for maintaining the quality of your Hardie Plank siding. For instance, minor gaps between planks can often be addressed with appropriate caulking. Loose planks might require refastening. Discoloration may be addressed with a specialized cleaning solution. Always consult the manufacturer’s guidelines for recommended cleaning and repair procedures.
Potential Problems and Solutions
| Problem | Solution | Problem | Solution |
|---|---|---|---|
| Gaps between planks | Apply appropriate caulking | Loose planks | Refasten securely using appropriate nails |
| Minor cracks | Consult manufacturer’s guidelines for repair | Discoloration | Clean with a mild detergent solution; consider repainting if necessary |
| Water damage | Identify and repair the source of the leak; replace damaged sections | Nail pops | Countersink and refill with matching caulk |
Mastering Hardie Plank installation is about more than just following instructions; it’s about understanding the nuances of this high-performance siding. By carefully preparing your surface, selecting the appropriate materials, and executing the installation techniques precisely, you can achieve a stunning and long-lasting result. Remember, attention to detail during each phase – from pre-installation planning to post-installation maintenance – is key to maximizing the lifespan and beauty of your Hardie Plank siding. With this guide as your blueprint, you’re well-equipped to embark on this rewarding project.
User Queries
Can I install Hardie Plank myself, or should I hire a professional?
While DIY installation is possible, it requires skill and attention to detail. Hiring a professional ensures a quality installation, especially for complex projects.
How long does Hardie Plank siding typically last?
With proper installation and maintenance, Hardie Plank siding can last for decades.
What kind of warranty does Hardie Plank offer?
The warranty varies depending on the specific product, but generally covers defects in materials and workmanship.
What’s the best way to clean Hardie Plank siding?
Regularly wash with water and a soft brush. For stubborn stains, use a mild detergent solution.
Can Hardie Plank be painted?
Yes, Hardie Plank can be painted, but it’s crucial to use a paint specifically designed for fiber cement siding.